Overview
One of the biggest issues any website will face as it grows in popularity is performance, this is the speed at which a site will typically serve content to your visitors! As any website owner will tell you a quick website is essential to keeping customers happy, yet surprisingly this is an area which is often overlooked or seen as unimportant!
As more people visit your website in any given month the strain on the server and the bandwidth used to host the website will increase, in addition to this you might find you site starts to gain visitors form all over the world, geographically speaking. This is especially true when operating an English language site as its content will most likely be relevant to people residing in all English speaking countries across the world including the UK, Canada, USA, Australia, New Zealand and so on.
Whilst the performance issues with the server can often easily be remedied (i.e. a more powerful server) the serving of content to visitors thousands of miles away from the physical location of the server is not so simple to fix. There are, in-fact, multiple ways to get around this issue but one of the simplest, most cost effective and almost certainly the easiest to manage method is via the use of a Content Delivery Network (CDN).
In this post I will be going through how I have set my own site (jexy.uk) up with a CDN, set up a custom sub-domain name for delivering media assets via the CDN and then integrated this CDN into the WordPress CMS platform used to run the site itself.
What is a CDN?
A CDN is a network of servers used to deliver media to internet users across the world, this is achieved by the content itself being placed on all of the servers globally and the CDN network intelligently delivering content to users from the server located physically nearest to them.
By delivering content such as photos and video from a location close to the user you can (sometimes significantly) cut the time it takes for this media to be downloaded. This reduction in turn reduces the time taken for a webpage to load making the whole page appear “quicker” to a visitor landing on your website.
In addition to reducing page load times a CDN can also be configured in such a way as to make it easy to manage and (for the most part) 100% automated in how it handles any new media added to the site. This means that any website can easily take advantage of a CDN with little additional ongoing maintenance and administration needed.
Looking for a Cost Effective CDN
As of 2020 there are multiple CDN providers available, this includes specialist companies focusing solely on providing CDN services as well as big cloud computing providers like AWS who also offer CDN amongst many other services.
Most of these specialist providers are, unfortunately, relatively expensive when it comes to utilising their services on a smaller website with a relatively small numbers of visitors, often due to pricing structures which are based on a “per site” model. For someone like myself who operates several smaller sites the prospect of paying a relatively large fee per site (and then more for bandwidth on top) is not at all appealing nor cost effective.
Fortunately, whilst looking for a solid, reliable and yet still cost effective CDN provider I cam across DigitalOcean and their Spaces service! Spaces is not a dedicated CDN service in itself but instead a cloud object storage service (similar to AWS S3) which allows users to optionally turn on a built in CDN service which can be used to deliver any stored files across their own CDN network.
At only $5/month for 250GB of storage with 1TB of outward bandwidth included across both the storage and the CDN network DigitalOcean Spaces represents great value. This is especially good value when it is considered that this service can be used across multiple websites for no additional “per site” fees. The only real additional fees to be aware of are a $0.02/GB fee when over the 250GB of storage and a $0.01/GB charge over the 1TB bandwidth usage cap (still very reasonable).
Setting up a DigitalOcean Spaces CDN within WordPress
Now I have decided on Spaces as my CDN provider the first step are to implement this are to setup DigitalOcean’s nameservers for my domain (explained why in a minute), setup the Spaces service itself, turn on the CDN functionality, configure it for use with a subdomain for delivering assets and finally integrate all of this within my WordPress site.
Setting up my Domain to Use DigitalOcean’s Nameservers
Firstly, this is not 100% necessary in order to get the Spaces CDN working. The reason I am taking this step is because when the domain being used is pointing to DigitalOcean’s nameservers, DigitalOcean themselves will be able to automatically generate a Let’s Encrypt SSL certificate for the sub-domain used with the CDN for us.
These days it is (realistically) necessary to have everything delivered over SSL, this includes any media assets delivered via the CDN and could even result in secure web page warnings (mixed content warnings) if the page itself is delivered over SSL and the CDN assets not.
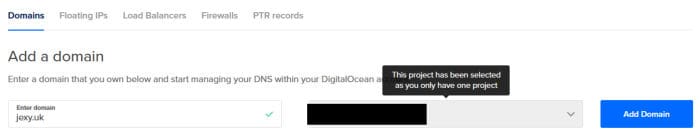
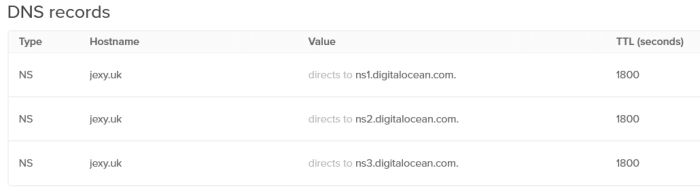
To begin this process, first, I must add the domain into DigitalOcean via the Domains/DNS section, from this section of the control panel a new domain can be added into my DigitalOcean account and subsequently the DNS records also set.
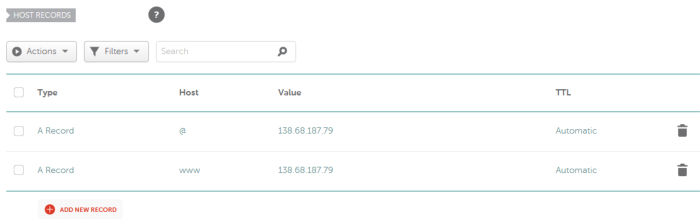
Before going any further, the next job is to make a note of the DNS records for the domain as it currently stands, these will of course need to be copied over to the new DNS server at DigitalOcean in due course. It is important to make a note of these records sooner rather than later so as they don’t disappear when the nameserver change is completed.
Once the domain is added to DigitalOcean and the DNS records noted the next job is to change the nameservers for the domain at the domain registrar. Changing the nameserver for any domain will differ slightly depending on which domain registrar you use but it is generally very easy to do (I use Namecheap myself).
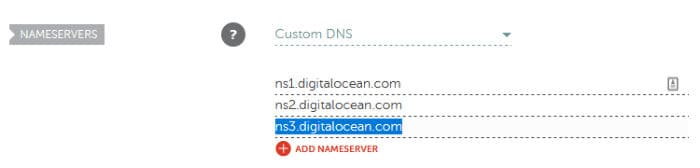
DigitalOcean will give use the nameserver addresses to use, these are currently ns(1,2,3).digitalocean.com.
Now the new nameserver records are set for the domain the next job is to add the new DNS records, these can be added right away even if the nameserver changes have not yet taken effect.
It is important to note that the website might be briefly unavailable during this changeover, this is due to the new nameserver and DNS settings propagating. I have found that hosting companies like to really layer it on about how these changes can take 24 – 72 hours (I’ve even been quoted up to a week before) but in my experience it rarely takes more than a few minutes to take effect!
Now I have the domain added to DigitalOcean and using their DNS service I am ready to move on and setup the Spaces storage container for this site.
Setting up DigitalOcean Spaces (and Enabling the CDN)
Since I have been using DigitalOcean since 2014 for hosting I already have an account, this means turning on Spaces is as simple as logging in and from the top drop-down menu labelled “Create” selecting the option to create a new Space:
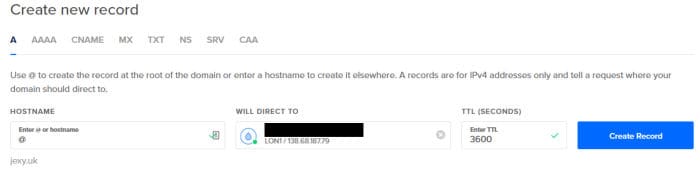
The screen for creating a new space is easy to use and well laid out, the first thing to do is select a data-centre region and then just below this click the option to enable the CDN on this new space.
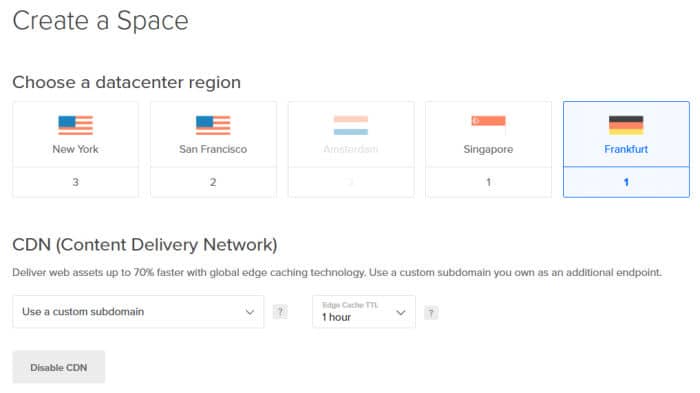
Clicking to enable to CDN will take us away from this process for a little time to configure the subdomain for accessing our storage via the CDN. It is not strictly necessary to do it this way but I feel having media assets delivered on the same top level domain as the site itself looks professional (and probably very reassuring to Google as well?).
When clicking on “use a custom subdomian” a drop down list will appear showing any subdomains already configured on the account, at the bottom of this list is an option to create a new subdomian certificate which is the option I want:
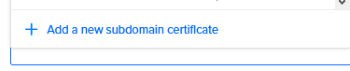
Clicking this option will allow me to both create the subdomain DNS records and simultaneously tell DigitalOcean to configure the subdomain with Let’s Encrypt so it will automatically have an SSL certificate generated for it which will be automatically renewed for me. Remember, this is a very convenient feature but DigitalOcean do insist you use their nameservers and DNS for this service to work, the alternative would be to buy a cheap SSL certificate for the subdomain elsewhere, but this would be an additional cost and would also involve having to renewing it manually every year, not ideal!
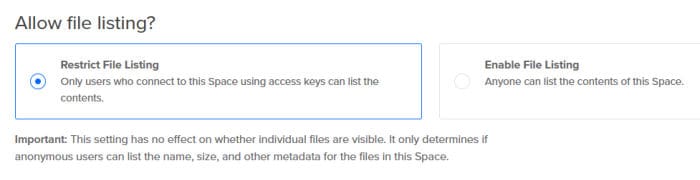
Next we will be asked whether or not to allow directory listing on the storage container, I have left this to restricted although it is important to note this does not make the container private! (it only means the contents can’t be listed, the individual files can still be public!).
Finally, for this section at least, all that remains is to give the new container a meaningful name and hit the “create space” button.
Setting up the DigitalOcean Spaces Sync WordPress Plugin (and moving files)
Now the container and CDN are configured, the next step is to configure WordPress itself to make use of the new CDN and serve any static content from the CDN rather than the server itself. The easiest way to do this would be to make use of a plugin and fortunately for us there is one, mentioned by DigitalOcean themselves, which seems to work well (called DigitalOcean Spaces Sync).
There are, of course, other plugins out there which will also work but I have fund most of them are premium plugins with quite restrictive pricing models (again, remember I want to move away from the “per site” model and deliver a CDN as cost effectively as possible!). As such I have decided to use the DigitalOcean Spaces Sync plugin as I don’t see the point in setting up a CDN which isn’t charged per site only to then use a plugin which is!

Once the plugin is installed there is (unfortunately) a little bit of configuration for us to do manually before it can be used. This configuration involves connecting the plugin to our new container, moving over any media files and then finally configuring the caching plugin to use the CDN for serving media assets.
Setting up Access to the Container
In order for our plugin to access the new container I created earlier, access must be granted via way of an access key enabling the holder to access. To create such a key involves first accessing the Spaces section of the DigitalOcean web console and then clicking the “Manage Keys” button to start creating a new key.

Next, the key can be created by clicking on the “Generate New Key” button, this will generate a key and secret phrase which together can be use as credentials to access the Spaces container from within the WordPress plugin.
Note that in the above form we need to input the key details (which are of course secret once they are generated), the bottom two boxes simply refer to the container name and the container endpoint server (which in my case is Frankfurt):
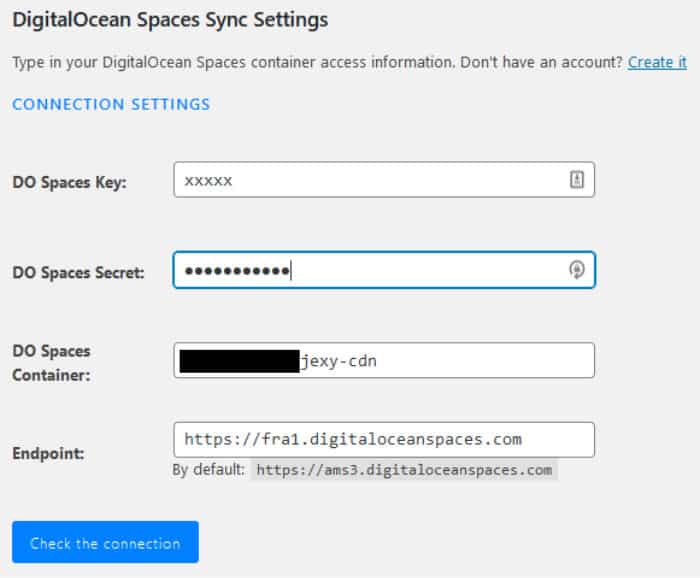
Note that in the above form we need to input the key details (which are of course secret once they are generated), the bottom two boxes simply refer to the container name and the container endpoint server (which in my case is Frankfurt):
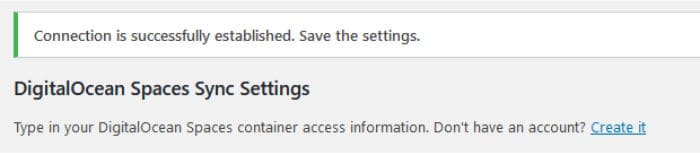
Once everything is entered here (like above) the connection to the container can be checked with the “Check the connection” button, if all is good we can move on.
Moving the Existing WordPress Media Files Over
Now access is available to the container from the plugin I now need to move my existing media files over to the Spaces container. Unfortunately the “DigitalOcean Spaces Sync” plugin will only automatically copy any newly added media to the container from this point onwards (well, after this is configured under the “FILE & PATH SETTINGS” section in a little bit). This means I will have to manually copy over any existing media prior to the plugin working myself.
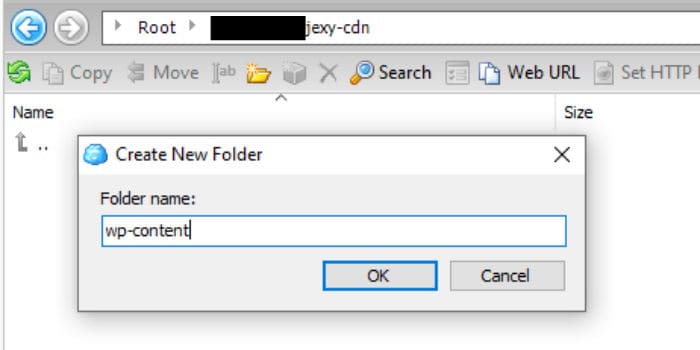
To do this I am using Cloudberry Explorer, with this tool I can simultaneously connect to both my web server (which is hosting the site) and to the newly created container simultaneously, whilst connected to both entities I can simply copy any existing media files across from one too the other. Since I don’t want to copy everything in the wp-content WordPress directory across I am creating the “wp-content > uploads” directory manually in the Spaces container followed by each relevant year’s sub-directory.
Once all of these directories have been created I can simply copy across all existing images which have been uploaded to the website so far:
NB – For now I have decided to only focus on image and video files, I will leave other static content such as CSS and JavaScript files out for now. This is because including them will make managing the CDN integration more complex and for the minimal performance benefit this will bring I don’t think it is currently worth it. The main focus is on getting images and videos moved over.
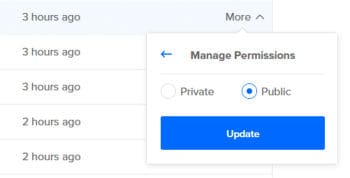
After all of these existing files have been copied across the arduous task of setting them all to be publicly accessible is next, this can be done in a tool such as Cloudberry Explorer en mass or via the DigitalOcean web console (which will take quite a while as new permissions cant be propagated down automatically):
NB – After changing the file permissions en mass via a tool such as Cloudberry Explorer I have found it always necessary to purge the CDN cache before the changes take effect, this is can be done within the DigitalOcean web console.
Once all existing media files have been moved over and the security levels changed (in the format as per above) the next part of the plugin can be configured so as to automatically add any newly added uploads to the spaces container automatically. The “FILE & PATH SETTINGS” section is below the section I used a little earlier to configure the connection:
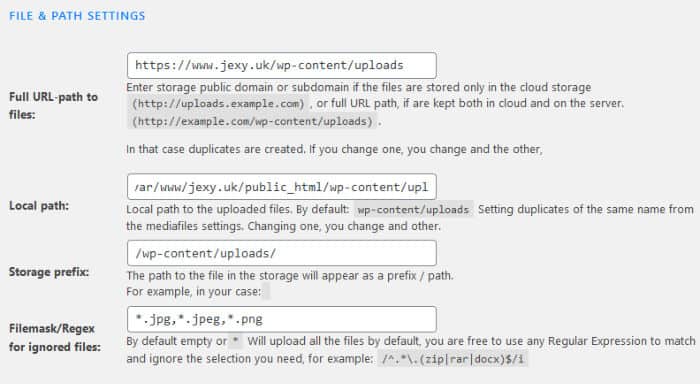
It is here (as per the above image) that the configuration can get a little tricky and might involve a little bit of trial and error (I have this setup on other sites so I know how it works already). Below I have briefly detailed each parameter with a quick description of what it is:
Full URL-path to files: This parameter is the URL for the WordPress uploads directory
Local Path: This is the directory path on the local Linux web server to the same directory as above.
Storage prefix: This is essentially the directory in the Spaces container to use, for simplicity I have tried to keep the directory structure similar
Filemask/Regex for ignored files: Here can be specified which files to include or exclude, as mentioned a little earlier I am currently only looking to include image files.
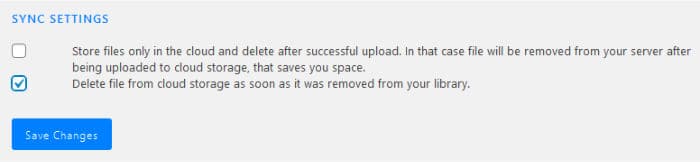
After these details are set the only remaining (small) parameter to set is under the “SYNC SETTINGS” section where I can check to have any files deleted from the WordPress media library simultaneously deleted from the Spaces container automatically:
Finally, the settings here can be saved!
To test this configuration is working correctly I will quickly upload a test image to my WordPress site, if everything is ok it should show up in the Spaces container:
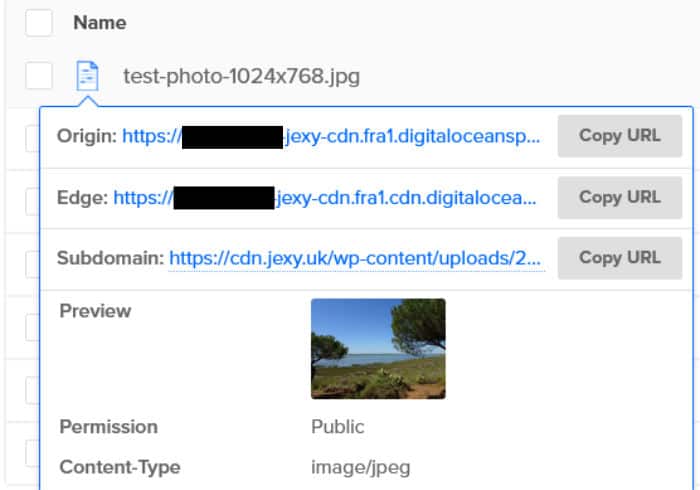
As can be seen above the file has indeed been automatically copied across to the Spaces container, the drop down indicates the 3 paths we can use to access this image with the “subdomain” one been the one which will be served via the CDN!
Integrating the CDN into the Cache Plugin
This is, in many ways, the final step to getting this solution working although it is one which will differ slightly depending which caching plugin you use. At time of writing I use the Comet Cache pro plugin from WebSharks which makes it really easy to integrate a CDN into the cached version of a webpage which is served to visitors:
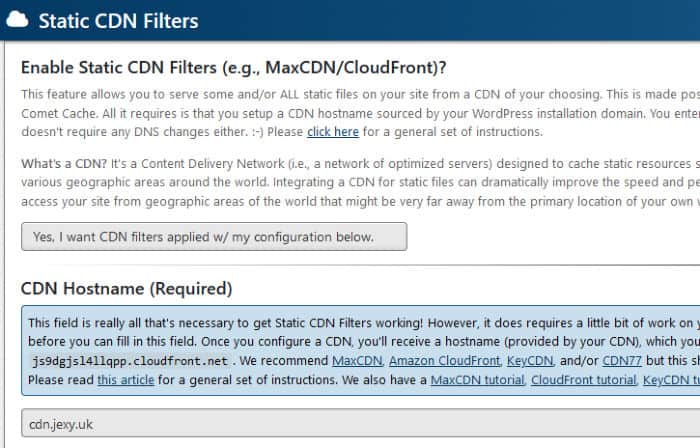
As per the settings screen shot above, all that is really needed is to enable static CDN filters and then provide the CDN hostname to be used, this hostname, of course, being the subdomain setup earlier on.
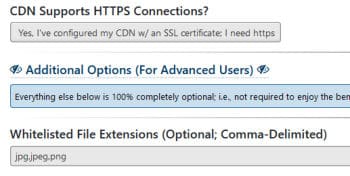
The only other two settings to change (under advanced settings) are to switch on HTTPS for delivering CDN assets and then to whitelist any image extensions to be server via the CDN (meaning only images of these formats will be eligible, everything else will be server from the web server).
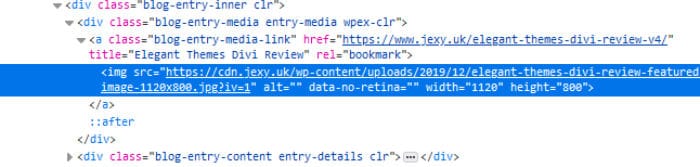
And with this final configuration the CDN should be setup, working and delivering any images from the WordPress CMS via the CDN. The quick and easy way to test this is working is to open up the site, then open up developer tools in the browser and then inspect on of the images, it should show as being delivered via the cdn.jexy.uk subdomain like below:
Summary
Whilst not the “easiest” CDN setup in the world there are a lot of benefits to using the DigitalOcean Spaces CDN. The fact that multiple sites can take advantage of this CDN service without any additional “per site” fees is a big plus when (like me) you might run multiple smaller sites with a globally dispersed audience.
Spaces is also a very useful storage container service in its own right and by also being AWS S3 compatible means existing S3 compatible tools and software can also take advantage of the storage on offer. This also makes it an excellent choice for taking backups of an existing WordPress website using a plugin which would originally be used to backup to AWS S3 (and will now potentially deliver much cheaper backups as well).
At some point I might need to revisit this decision and look at a different CDN solution, especially as this current configuration means it is quite difficult to get CSS and JavaScript assets served and yet still automatically updated via the CDN. I could, of course, move any such assets to the CDN manually but this could cause problems, especially after the site might have updated a plugin automatically!